Motorola Moto G finally launched today for

Posted by Unknown Selasa, 04 Februari 2014 0 komentar

We've already shared why Motorola Moto G worth your money and it's now available on Flipkart exclusively. We'll be reviewing moto G soon stay tuned.
Price for 8GB version is 12,499 and 16GB will cost 13,999. According to some of my sources they will start shipping from 7th Feb.

Moto G on Flipkart

R.I.P. cheap desi phones, at this price Moto G will quicky capture whole market of budget android phones.
What is your opinion?

Update

In exclusive association with MOTOROLA, Flipkart is launching the much awaited MOTO G phone tonight on 06-Feb (00:00:01 AM) which will also be amplified with a high impact Print & TV campaign. This phone will be available in India exclusively on Flipkart.com and nowhere else. We wanted to share the details with you in advance so you can be ready for communicating this to your customers/ users. This phone will be available at an awesome price starting from Rs 12,499/- only. Also, for launch day only (06-Feb from 00:00:01 am upto 11:59:59 pm), there will be additional offers mentioned below for all customers who purchase Moto G:
*Rs 500/- Off on any eBooks purchases over Rs 501/-
*Rs 1000/- Off on Clothing purchases over Rs 1001/-
*Flat 70% Off on colourful phone cases bought along with the Moto G
*A chance to win 100% Off (Flipkart store credit) on your Moto G phone purchase (for 100 lucky Moto G customers)
The Moto G product will be available for purchase on this landing page only from 06-Feb (tonight @ 00:00:01 am)

Update

Its finally available to buy
It came online on flipkart and sold out within 24 minutes, I was lucky to get one Others should not worry, Flipkart will restock it again today.


Baca Selengkapnya ....

How to run Android on your Computer

Posted by Unknown 0 komentar

You can use Genymotion app to continue using your Android apps on a desktop PC or laptop.There are various methods (like Bluestacks) of running Android apps on a PC, but these can be tricky to set up and vary greatly in the levels of performance and compatibility. Genymotion is relatively simple to install and provides pre-packaged Android installations which you can download and run on your PC or Mac. Best of all, it's fast and supports accelerated graphics quick enough even to run cutting edge 3D games.

There is something special for Developers
For developers, it also supports battery and GPS widgets so you can emulate different charging and power scenarios and test out how apps work in different World locations.

How to download and run Genymotion
To download Genymotion, you will need to sign up at genymotion.com. Once you've validated your email address and signed in, you can elect to download a version for Windows with VirtualBox included, or a version for Windows, Mac OS, Ubuntu or Debian, which will require you to have VirtualBox already installed. Once you've installed the software, sign in with your Genymotion credentials and you can select from a list of virtual Android devices with varying hardware configurations and versions of the Android operating system. We would recommend downloading any of the latest available versions, which will fit comfortably on the screen and come bundled with Google apps. Your virtual Android device will then be automatically downloaded. All that remains for you to do is click the Play button and start it up. You can then sign into your new device with your Google account and download and run any apps you wish.

Don't forget to share article with friends using buttons below.


Baca Selengkapnya ....

Game of the week : Flappy bird is new trend in casual games.

Posted by Unknown Minggu, 02 Februari 2014 0 komentar

Game of the week : Flappy bird
Developer : .GEARS studio
Price : Free
Size : 0.9MB
Requirements : Any phone running Froyo 2.2 or above.

Many of you will be aware of new casual game "Flappy Bird". The game has super-simple gameplay. We found it as combination of old Helicopter and Mario. Though the gameplay is simple, one will still find difficulties while crossing 10 to 20 obstacles.

Audio and Visuals
Game looks like old 8-Bit games(liks Mario). The developer has focused on simple game play, so this is not for one who is seeking for modern cutting edge graphics game. Keep in mind that game only weighs 0.9MB. In audio section too simplicity continues, there is only two audio effects in game and no background music at all.

Gameplay
In flappy bird there is only one mission, all you need to do is keep the bird in air and avoid constantly coming obstacles( which are pipes ). You can keep the bird in air by tapping on screen. Simple, isn't it?

Bottom line
Flappy bird is simple as well as difficult. The gameplay is good for those who want to pass the time in boring lectures( Like me? )
WARNING : You won't be able to quit the game as its highly addictive.

Pros: Small in size, battery friendly, simple and addictive.
Cons : None.
Rating: 4.3/5

Download Flappy bird from Google play.

Don't forget to share review of this awesome game by using buttons below.


Baca Selengkapnya ....

Create comic strips with Bitstrips

Posted by Unknown 0 komentar

You’ll almost certainly have seen Bitstrips cartoons in your Facebook news feed, so why not join the latest craze of Bitstrips?
What better way to spend a morning hanging around a deserted train station in Mumbai than to create hilarious comics strips starring yourself and your Facebook friends?

This is the service offered by free Android and iOS app Bitstrips, and by now you’ll almost certainly have witnessed its popularity through the cartoon adventures spread all over your Facebook news feed. Bitstrips is a huge app in size to download, but it includes a good number of high-quality cartoons, and you can go into some detail when designing your avatar. You must log in via Facebook, alternative logins are coming soon. You then create your avatar in great detail, including gender, outfit, hairstyle, build, eye color and much more.

If you like being the center of attention, you can feature alone in your cartoons, but Bitstrips really is more fun when you involve your friends. If they already have Bitstrips avatars then you can include them in comic strips without their permission; if they don’t, you can create an avatar for them. The app’s home page then delivers a scrolling list of the latest comics, and you can add new characters at the top of the page. Tap the Create icon at the bottom of the screen to create your own greeting card, status- or friend comic, within which you can choose from categories such as Birthdays and Anniversaries or Pranks and Insults.

Are you suffering from slow rendering of your images in gallery? Use QuickPic

Once you’ve selected a particular cartoon, you can edit the character’s facial expressions and add your own speech bubbles then you are one click away to share it online with Facebook friends. In archives tab you can see any comics your friends have created, plus your own cartoons on a separate tab.

Bottom line
Bitstrips is more than likely another Facebook's byproduct, but this comic-creating app is loads of fun and it’ll have your friends in stitches.
It’s worth your one try.

See more app of the day

Grab Bitstrips from Google Play.


Baca Selengkapnya ....

Flipkart teases with coming soon tag on Moto G.

Posted by Unknown Jumat, 31 Januari 2014 0 komentar

You might be aware that Moto G is one of the most awaited phone in india and we have also listed it as best budget friendly phone.
Now FINALLY its about to launch, According @Motorola twitter handle 5th feb is the date for announcement.

Today leading online store Flipkart has listed Motorola Moto G with "Coming soon..." tag.
Moto G page on Flipkart

What you guys are thinking?
feel free to comment below.

Update : Its available now

Get Moto G from flipkart

Baca Selengkapnya ....

Oppo makes its way to India by launching N1

Posted by Unknown Kamis, 30 Januari 2014 0 komentar

Coming from chinese manufacturer Oppo N1 gave surprice to whole android world by Pre-Installed CyanogenMOD and some other cool features. Today Oppo launched the N1 in India for price of 39,999 INR. N1 is Oppo's first phone in India.

Lets check some major features and disadvanges of Oppo N1.
*5.9" Full-HD Super IPS LCD (373ppi)
*Android 4.3 Jelly Bean & CyanogenMod 10.2(Will get update of 4.4 & CM11)
*2GB RAM
*Quad-core 1.7 GHz Krait 300 CPU
*Adreno 320 GPU
13 MP Rotating camera with Dual LED flash, Autofocus.
*O-touch Touchpad on the back
*3610 mAh battery
*Premium class looks

Disadvantages
*Non expandable storage( 16/32GB options)
*Non user-replaceable battery
*Huge in size.
*Krait 300 is EOL and its not enough for a sub 40k phone.

Bottom line
Hardcore flashers/Modders (how to mod phone easily? )will find Oppo N1 as heaven. As CyanogenMod has a huge community support and its biggest aftermarket android OS as of now you won't need to wait for android updates new cool features.


Baca Selengkapnya ....

Survival: Making Fire

Posted by Unknown 0 komentar


When it comes to starting fires in the wild, there are always different ways to make fire, today we will explore the best five ways to make fire without matches or lighters.
For all of the methods below, you will need a tinder nest to nurture the sparks and/or embers you create into a flame. In order to create friction and maintain a flame, you will need to use extremely dry wood.


1. Using Batteries and Steel Wool
  1. Make a tinder nest out of any dry plant material that easily catches fire. You can use dry grass, leaves, small sticks, and bark. This nest will be used to create a flame out of the spark you create with the battery and steel wool.
  2. Find a battery and locate the battery terminals. The terminals are the two circular receiving prongs located on the top of the battery. Any battery voltage will work, but 9-volt batteries will ignite the quickest.
  3. Take your steel wool and rub it on the battery terminals. The finer the steel wool, the better for this process.
  4. Continue to create friction by rubbing the steel wool on the batteries. This process works by creating a current through the tiny steel wires that then heat up and ignite. Another way to do this is to take a 9-volt battery and a metal paperclip and rub the paperclip on both battery terminals at the same time to create sparks. This is similar to how the wires in light bulbs and toasters ovens operate.
  5. Blow gently on the steel wool as it starts to glow. This helps nurture the flame and encourages it to spread.
  6. Once the steel wool is glowing brightly, transfer the steel wool to your tinder nest quickly, continuing to blow lightly on the nest until the tinder ignites, creating a flame.
  7. Add increasingly larger pieces of dry wood to build your fire once the tinder nest has ignited into a flame and enjoy your fire.
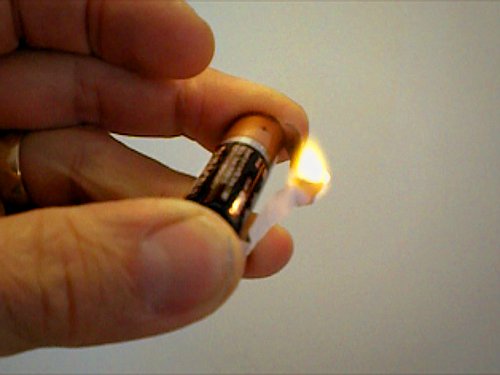
1a. Using a AA battery and a gum wrap
  1. You need tinder and wood ready, a AA battery and a gum wrapper (the metallic kind).
  2. Cut or tear the gum wrapper into a thin strip
  3. Fold the strip in half, then at the fold carefully cut it at an angle to form a point but still leaving you with an intact strip.
  4. Now put the ends of the strip on each terminal of the battery, the shiny side facing the battery. At the part where the strip was narrowed down it will catch on fire.


2. Using Flint and Steel
  1. Again, build a tinder nest using dry plant material.
  2. Take your flint rock (a rock that emits sparks) and hold it between your thumb and forefinger. Allow about two or three inches of flint to extend past your grasp.
  3. Grab a piece of char cloth between your thumb and the flint. Char cloths are small squares of cloth that have been turned into easily combustible charcoal pieces. If you do not have any char cloth on hand, you can also use lightweight tree fungus.
  4. Take the back of a steel striker or the back of a knife blade (depending on which you have handy) and quickly scrape the steel against the flint. Continue to strike until sparks begin to form.
  5. Catch the sparks with your char cloth and continue the process until the cloth glows like an ember. Char cloths are specially designed to hold a glow without catching fire.
  6. Transfer the glowing char cloth to your tinder nest and gently blow on it to induce a flame.
  7. Begin to add increasingly larger pieces of wood to grow your flame into a fire.


3. Using a Magnifying Glass
  1. Notice whether or not there is enough sunlight to create a fire using this method. You generally need the sun to be unobstructed by clouds in order to utilize it with your magnifying glass. If you do not have a magnifying glass, eye glass lenses and binocular lenses work as well. Adding water to the lens allows you to create a more intense, focused beam of light.
  2. Build a tinder nest out of dry material and set it on the ground.
  3. Tilt the lens toward the sun until the lens creates a small circle of focused light on the tinder nest. You'll probably have to test out holding the lens at different angles to create the most focused beam of light possible.
  4. Hold the lens in place until the tinder begins to smoke and flame. Blow lightly on the tinder nest to nurture the flame.
  5. Begin to add increasingly larger pieces of dry wood to your tinder nest to create the fire size you desire.
 Note: This will also work with: water bottles and condoms!

3a. Using Coke Can and Chocolate Bar
  1. I saw this method in a documentary a while back ago and thought it was pretty impressive. You need is a soda can, a bar of chocolate, and a sunny day.
  2. Polish the bottom of the soda can with the chocolate. Open up your bar of chocolate and start rubbing it on the bottom of the soda can. The chocolate acts as a polish and will make the bottom of the can shine like a mirror. If you do not have chocolate with you, toothpaste also works.
  3. After polishing the bottom of your can, what you have is essentially a parabolic mirror. Sunlight will reflect off the bottom of the can, forming a single focal point. It’s kind of like how a mirror telescope works.
  4. Point the bottom of the can towards the sun. You’ll have created a highly focused ray of light aimed directly at your tinder. Place the tinder about an inch from the reflecting light’s focal point. After awhile you should have a flame.
Note: While I can not think of any time that I was in the middle of nowhere with a can of Coke and a chocolate bar, this method actually works!
 

4. Fashioning a Hand Drill
  1. Build a tinder nest out of any dry plant material. Again, be sure that the material can catch fire easily.
  2. Find a piece of wood to use as the base of your hand drill, otherwise known as a fire board. You will drill on this wood piece to create friction.
  3. Use a knife or any sharp object to cut a small, V-shaped notch in the center of your fire board. Make sure that your notch is just big enough to hold your spindle stick.
  4. Place small pieces of bark underneath the notch. The bark will be used to catch an ember from the friction between the spindle and fire board.
  5. Take your spindle stick, which should be a thin stick about two feet long and half an inch in diameter, and place it in the V-shaped notch in the center of your fire board.
  6. Hold the spindle stick between your two flat palms and begin to roll the spindle back and forth. Be sure to push the spindle stick firmly down into the fire board.
  7. Continue to roll the spindle quickly between your hands, pushing one hand forward and then the other, until an ember is formed on the fire board.
  8. Transfer the glowing embers to a small piece of bark. You should have already placed a few small pieces of bark next to the notch for this purpose.
  9. Place the bark containing the ember onto your tinder nest. Continue to blow gently on the tinder nest to fully transfer the ember and create a flame.
  10. Begin to add increasingly larger pieces of wood to maintain a larger fire. Be advised that this method takes a while to create a fire, and requires physical as well as mental determination.
  

5. Making a Bow Drill
  1. Again, make a tinder nest. Use any dry plant material you can gather.
  2. Find an object to use as a socket such as a stone or a heavy piece of wood. The socket will be used to put pressure on the spindle.
  3. Find a long, flexible piece of wood about the length of your arm. It is best if this piece of wood has a slight curve in it. This will serve as the handle of your bow.
  4. Make the string of the bow using any strong, abrasive material that can withstand a lot of friction. You might want to use a shoelace, a thin rope or string, or a strip of rawhide.
  5. Tie the string as tight as possible to each end of the bow handle. If there are not already natural notches in the bow wood to anchor the string, whittle small, straight notches into the wood in order to act as a groove for the string.
  6. Find a piece of wood to use as the base of your hand drill, otherwise known as a fire board, and cut a small V-shaped notch into the center using a knife or other sharp object.
  7. Place your tinder nest underneath the V-shaped notch. You want to have the tinder right next to base of the spindle so that you can easily create flames.
  8. Loop the bow string around your spindle stick one time. Make sure you do so in the middle of the bow string to create enough space to roll the string back and forth.
  9. Place one end of the spindle in the V-shaped notch in your fire board and then stack the socket on the top end of the spindle. Hold the socket with your non-dominant hand.
  10. Begin sawing the bow quickly back and forth, holding the curved, wooden part of the bow in your dominant hand. This will cause the spindle to spin (hence the name "spindle") and create heat at the base of the fire board.
  11. Continue to saw back and forth until you create an ember where the spindle meets the fire board. Make sure your tinder nest is close by.
  12. Gather the ember you created onto a piece of scrap wood and drop it into your tinder nest. You may just be able to slide the ember off of the fire board into your tinder nest.
  13. Blow on your tinder nest as you gradually add increasingly larger pieces of dry wood to create a fire.


Bonus: Cotton Ball Fire Starter
  1. One of the best hacks there is to make fire, since it is water proof, always lights incredibly easily, is an infallible additive for a tinder bundle (especially a damp one) and easily takes a spark directly from a ferro striker or metal match. Not only that, it can be used as an occlusive wound dressing, smokeless fuel for a hobo stove, to ease chapped lips and dozens of other things as well.
  2. To make your fire starters, you just need two ingredients – vaseline (petroleum jelly) and cotton balls. Any brand of petroleum jelly will work, just make sure it’s 100% pure petroleum jelly. For the cotton balls, check the package to be sure they are 100% cotton. Artificial fibres will not take a spark.
  3. Rubbing the Vaseline into a cotton ball is messy work. The fibers of the cotton ball pull apart some, and the Vaseline gets everywhere. A cleanest, easiest method is to put a scoop of Vaseline into a snack-sized ziplock bag, toss some cotton balls in, zip it up, then knead the Vaseline into the cotton balls.
  4. You want to get as much Vaseline in the cotton ball as you can without completely saturating the cotton ball. It’s very important to have some dry fibers available to take the flame, especially if you use a firesteel or magnesium rod.
  5. Finally you just need a spark either from rocks or better yet from a flint.
Note: This method requires saving the vaseline cotton balls either in a ziplock bag or in a small pills dispenser. Then you can carry it with you in your survival gear. When using Vaseline Cotton always be careful, as the melting gel can drop flame onto unintended surfaces.  


Final Thoughts
These are some of the methods to making fire without matches or lighters, there are many others. You should try to practice a couple a see which suits you best. Finally, please make sure that 1) you only have fire in designated areas and 2) there is no temporary fire ban in the region.


If you enjoyed this article, please consider tipping me using Bitcoin. Bitcoin Address: 1CZMXfdyJzquJaagpHixzizuN2SxFbefTP


Source:


Baca Selengkapnya ....
Trik SEO Terbaru support Online Shop Baju Wanita - Original design by Bamz | Copyright of android illegal.