Tampilkan postingan dengan label tips. Tampilkan semua postingan

How to run Android on your Computer

Posted by Unknown Selasa, 04 Februari 2014 0 komentar

You can use Genymotion app to continue using your Android apps on a desktop PC or laptop.There are various methods (like Bluestacks) of running Android apps on a PC, but these can be tricky to set up and vary greatly in the levels of performance and compatibility. Genymotion is relatively simple to install and provides pre-packaged Android installations which you can download and run on your PC or Mac. Best of all, it's fast and supports accelerated graphics quick enough even to run cutting edge 3D games.

There is something special for Developers
For developers, it also supports battery and GPS widgets so you can emulate different charging and power scenarios and test out how apps work in different World locations.

How to download and run Genymotion
To download Genymotion, you will need to sign up at genymotion.com. Once you've validated your email address and signed in, you can elect to download a version for Windows with VirtualBox included, or a version for Windows, Mac OS, Ubuntu or Debian, which will require you to have VirtualBox already installed. Once you've installed the software, sign in with your Genymotion credentials and you can select from a list of virtual Android devices with varying hardware configurations and versions of the Android operating system. We would recommend downloading any of the latest available versions, which will fit comfortably on the screen and come bundled with Google apps. Your virtual Android device will then be automatically downloaded. All that remains for you to do is click the Play button and start it up. You can then sign into your new device with your Google account and download and run any apps you wish.

Don't forget to share article with friends using buttons below.


Baca Selengkapnya ....

App of the day - QuickPIC is the fastest image viewer in Android.

Posted by Unknown Rabu, 22 Januari 2014 0 komentar

App of the day : QuickPic
Price : FREE.
Prime use : A lightweight replacement for your stock gallery.
Pros : Light weight and lightning fast still free.

Most people only view their photos on the device they took them on so it makes sense
to make the viewing experience as pleasant as possible. That is exactly what this app offers.

QuickPic can either be used in addition to your stock gallery or can replace it entirely. Once installed, you can choose to openyour images through QuickPic or your standard gallery. If you're sold by it you could, if you have the option, make it the only gallery available on your device. The biggest benefit of QuickPic is speed. It is a lot quicker than any Android gallery and can handle hundreds of images without slowing down your phone, this is all because of robust cache system used in app. The images are presented in grids grouped by individual folders. Images are really bright and dynamic on the flick-throughpresentation mode. You can also choose which folders to include in your gallery and keep your private ones hidden.
You should also look at VSCO camera(capturing sharp photos) and Snapseed(editing photos with ease).

Thanks for the TIP Niraj Dodia.

Get QuickPic from Google play.

Find more app of the day


Baca Selengkapnya ....

How to backup your phone using ADB.

Posted by Unknown Senin, 20 Januari 2014 0 komentar

So you are rooting your phone? Or just want to be on safer side and want to backup your phone?
Here is how you can do it.

Requirements

  • Android phone (running 4.0 or above)
  • Computer (Windows, Mac OS X and few linux distros are supported)
  • USB cable (it must support data transfer, usually one you find with your device out of the box will work)
  • ADB drivers or Android SDK(comment below if you are unable to find your device drivers or do a GOOGLE search)

Procedure

  1. Turn USB debugging on in settings-->developer options. If developer options are not visible then go to settings-->about phone-->click 7 times on baseband version.
  2. Connect your device with your computer by using USB data cable.
  3. Open command prompt in computer.
  4. Type 'adb devices' (without quotes! To see your device is recognized or not)
  5. Basically the command for backup is

    adb backup

    but there are many options for backups let see below and use one which you want. If you're aware of CMD then this will be easy for you.

    adb backup ( -f C:\xxxx.ab | -apk /-noapk | -shared / -noshared | -all | -system / -nosystem )
    -all will backup all apps
    -f *filepath* is used to describe path for backed up file.
    -apk will backup all apks too -noapk won't
    -shared will backup your external storages/sd cards too. -noshared won't
    -system tag will also backup system files too. -nosystem won't. -system is default.

    Example
    adb backup -apk -shared -all -f C:\mybackup.ab

  6. After typing command hit enter, now your phone may ask for encryption password enter it or leave it blank and you are good to go.

How to restore particular backup.
Follow steps 1-4 above.
Now type
adb restore C:\mybackup.ab

You may need to enter encryption password you entered earlier.
You whole device will get back to that state while you backed up.

If you have any doubts use comment section below.


Baca Selengkapnya ....

[ROOT]Easily MOD your phone with XPOSED!

Posted by Unknown Sabtu, 18 Januari 2014 0 komentar

Anyone can do the normal customization of android with skinned launchers and modded apps, some of us use advance way to mod apps by flashing zips or switching to Custom ROMs. But the easiest way of modding is XPOSED.

With help of Xposed Framework, you can apply mods/Tweak system just by downloading and installing a "module". Just download...Install...Reboot and you are good to go.

Warning: This app needs root, I am not responsible for any damage to your phone caused by rooting. Do some research before you execute.

Xposed framework can be installed on any ROOTED Android phone running 4.0.3+. Here is the direct download link for xposed installer. Once you've installed you shoyld search for good xposed modules, here is list of xposed modules.
You can also find some best xposed tricks here. You can get ParanoidAndroid's Halo. You can use GravityBox to edit most visual aspect of android. If you have samsung device then you should also try Wanam Xposed

After installing any module you must reboot. If you get stuck on bootloot then too there is a easy solution. All you need to do is flash a zip from recovery, go to recovery>flash Xposed-Disabler-Recovery.zip which you will find on your SD card.

Bottomline
If you don't want to move from stock rom or want to add more tweaks to your custom rom Xposed the best way for it and so far its safest way of modding android. Xposed does not really edit ANY SYSTEM FILE so you can revert back anytime.

Want to edit images in apk? Use my tool EAIT.


Baca Selengkapnya ....

Select the perfect browser for your needs.

Posted by Unknown Jumat, 10 Januari 2014 0 komentar

If you have an Android phone you don’t need to stick with the stock browser, you can easily install third party browser for your purposes. Not all of them are perfect in every field and your needs. Let’s see which one is perfect for what is perfect for you…

I want best rendering accuracy - Use Google Chrome

Google Chrome is now pre-installed browser in most phones and it’s available to download on play store for device running 4.0+. One of the key features is Sync with desktop chrome. Chrome is one of the best browser when it comes to user-friendly interface and rendering accuracy, but it’s slow while loading pages on low speed data connection like 2G. It has Flash as well aa HTML5 support and one of the best renderer. Multi-tab browsing in Chrome is heavenly feeling. Chrome is recommended Wi-Fi and 3G users.

I want to save my data and load page faster – Use Opera MINI

Opera MINI is well known as fastest browser out there for android. Opera Mini is designed as a fast and light browser for those who have slow speeds/Limited data. As you start browsing, Opera's servers fetches them and compresses images to provide a faster browsing experience. It
doesn't offer Flash support.
The drawback is that some most of the advanced pages will not render correctly. Still its highly recommended for 2G users and 3G users who want to save data.

I want to get most powerful inbuilt downloader – Use UC browser

UC browser is just OKAY in speeds and rendering but it has best inbuilt downloader out there. On the same connection while other browsers gave me 100KBPS to 120KBPS UC browser gave me around 200KBPS constantly. UC browser is recommended for downloading huge files on any connection. Warning: It doesn’t have resumable downloads, if you want resumable downloads after failures then try ES Explorer’s ES downloader.

I want to get all-in-one package – Use Dolphin Browser.

Dolphin Browser has lots of addon features. The app features easy multi-tab browsing, excellent bookmark and browsing history support, multi-touch zooming, simple navigation, Flash and HTML5 support. The interface in particular is excellent, it features two sidebars which can be accesed by swiping. Inbuilt downloader is also great while downloading large files.


Baca Selengkapnya ....

Use VSCO camera and improve your snapping capabilities

Posted by Unknown Selasa, 07 Januari 2014 0 komentar

Popular iOS camera app VSCO Cam is now available on the Google Play Store for devices running Android 4.0 and+.

VSCO Cam is future of Android mobile photography. Utilizing innovative technology, VSCO Cam makes it easier to take sharp images comparatively better than your stock camera app.
The superior technology of VSCO Cam is best seen in the editing of images. VSCO Cam includes a set of Presets and Tools with adjustable strengths, for efficient editing and precise customization. Professional snappers would like to add more presets and tools, which are available in the In-App purchases. You can do most things from vivid colors to black and whites. The app has inbuilt image gallery with thumbnails. You can easily share your photos with VSCO inbuilt sharer.

What we liked
>Photo quality
>Interface
What we didn’t like
>Images take almost double the space than the one from stock app.

You can use snapseed for more editing.
>>Download VSCO CAM from play store<<

Don’t forget to share article with friends using button below.

Thanks for tip Meet Doshi.
Tip us by using contact form or mail me ankushmenat@gmail.com


Baca Selengkapnya ....

Enhance system performance by using Internal Memory only

Posted by Unknown Minggu, 05 Januari 2014 0 komentar

If your device includes expansion mSD card capability, it is very tempting to just move every app to the card to save on internal memory. This will offer some performance benefits thanks to the extra memory, but if you use an app stored on the external card a lot, you could be forgoing these improvements with reduced performance when opening the app each time. The general rule of thumb, if you have enough internal memory, is to try to keep your most often used apps stored away from an expansion card(Or get faster SD card like Class 6 and above), remember RAM in android works in different way


Baca Selengkapnya ....

List of Google now commands

Posted by Unknown Minggu, 29 Desember 2013 0 komentar

Baca Selengkapnya ....

Top budget friendly Android devices to buy this New Year.

Posted by Unknown Sabtu, 28 Desember 2013 0 komentar

New Year is coming and many of us are planning to get a new phone/tablet but not all of us have 40k to spend on phones, so today I will share some good budget friendly and "Value for money" Android devices.

Xolo Q600
Xolo Q600 is powered by 1.2GHz Quad Core Cortex -A7 processor with 512MB of RAM enough to handle most of the apps and games available on play store. Phone is running on Android 4.2 (Jelly Bean) and Google now is working buttery smooth. With 4.5-inch FWVGA display this is not a good one for watching videos but still looks crisp and bright enough.
Q600 has 5 MP snapper and 0.3 MP secondary camera. Dual sim support is also good deal for those who don't want to carry two cheap phones. Battery life is good, with 2000mAH battery you can squeeze up to 1.5 day of mix usage.
>Buy Xolo Q600 from Flipkart<

Xolo Q700
Xolo Q series is all about "cool phones at lower price", Q700 is not different. Basically Q700 is improved version of Q600 and in my opinion Q700 is the phone from where actual "Performance" starts in Android.
Not like Q600, the Q700 has more RAM - 1GB, more battery - 2400mAH, better qHD IPS display. Rest specs are almost similar to Q600.
>Buy Xolo Q700 from Flipkart<

Sony Xperia M/M Dual
Xperia M is one of the cheapest phone with NFC capability. Running on older Android 4.1 (Jelly Bean) phone still has no lags while doing day to day stuffs because of 1 GHz Qualcomm Snapdragon S4 dual core processor along with 1GB of RAM. 5 MP primary camera is not for professional snappers but does the job for casual photographers. 4-inch Display looks extremely sharp and crisp. Xperia M also have dual-sim version.
>buy Xperia M from Flipkart<
>buy Xperia M dual from Flipkart<

Motorola Moto G
We have mentioned previously about Moto G. It may completely change the whole budget friendly android phone's definition.
Running on latest 4.4.2 KitKat OS with 1.2GHz Qualcomm Cortex-A7 quad core and 1GB ram, Moto G has beaten many top end phones in Benchmarks.
Phone is about to launch (1st or 2nd week of January), so one must wait for 2 weeks if planning to buy phone within 15k
>Read more about Moto G<

Sony Xperia L
Sony Xperia L is Slim and Lightweight phone designed for youngsters. Phone is powered by 1 GHz Dual core Krait Qualcomm processor along with 1GB of RAM, don't think that this is dual core and not powerful, Krait processor lineup is all about performance and top range by Qualcomm.
8 MP Camera with Flash for snapping is good deal and 0.3MP front camera is available for video calling. Xperia L still runs on Android 4.2 but 4.3 and 4.4 update are on the way. As usual Sony has provided some special Audio and Camera improvements
>Buy Xperia L from Flipkart<

Asus-Google Nexus 7(2012) tablet
We have already discussed why 1 year old Nexus 7 tablet still worth the money. It’s now available for 8-9k.
>Buy Nexus 7 from Flipkart<

Happy shopping from Android bqbq


Baca Selengkapnya ....

EAIT - Tool for editing images inside apk.

Posted by Unknown Sabtu, 21 Desember 2013 0 komentar

Today I am proud to present my new creation EAIT - EASY APK IMAGE THEMER.
Download from MY DROPBOX - not availaBle for few hours check again later

I see sometimes peoples get very shocked after they see my modded versions of whatsapp, so I thought lets make something which helps to *any* normal android user to edit any apk.
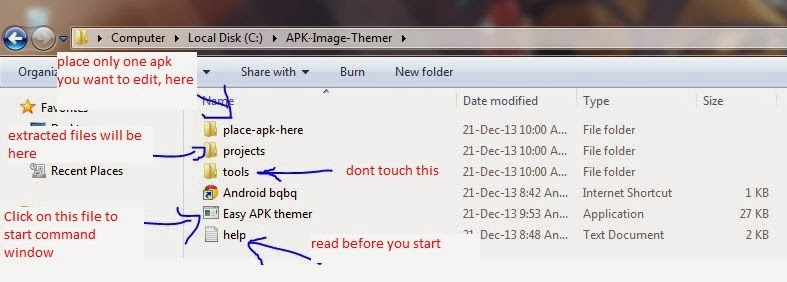
So what exactly is EAIT, it's a simple tool which extracts APK to let you edit images and then compress it back to .apk to install on your phone.

Steps:
What you need? JRE 6/7 -download them from java.com. Any good image editor like photoshop, GIMP or Paint.net 1. Download .rar from above.
2. Extract in C:/
3. Take backup of app(by ES explorer) you want to edit and move it to "PLACE-APK-HERE"
4. Run main application "easy apk image themer" from folder.
5. See your current apk will be listed on top.
6. Press 1 and enter to extract
7. Minimize the window and go to 'Project' folder. You'll find appname.apk folder, click on it.
8. Browse through "res" folder and see images inside drawable folders. Edit then with help of Photoshop/GIMP/Paint.NET.
Warning: rules of editing
>never edit "imagename".9.png files or you may get force close.
>If you want to replace image then choose something that has same resolution
9. After all editing maximize the window you previously minimized.
10. Press 2 and hit enter, wait for a while.
11. Press 3 and hit enter wait for a while.
12. You will find Signed-appname.apk in your "place-apk-here" folder
13. Send that app to your phone and install ( you may need to Un-install previous one)
14. Enjoy... Bookmark this blog ;)
Below are some pictures how it actually works
If you liked my work, like this


Baca Selengkapnya ....

How Android's RAM works and why you should not use task killers!

Posted by Unknown Kamis, 19 Desember 2013 0 komentar
How Android's RAM management works.
General information about RAM.
Random Access Memory is a temporary storage of any android (and most computers) to hold data. Understand with simple example of kitchen, your fridge that stores food for long time is just like memory cards or internal storage, the kitchen table on which food processing occurs is RAM and the chef who do this processing is processor. RAMS are generally way faster than SD cards, re-writable and used by many ways by different OS. Read below to find out how your Droid manages RAM.
In android unused ram is simply WASTED RAM!
Android is basically UNIX based OS (Just like MAC OS X and Linux distros) and it would like to use maximum available RAM in system. Generally it would like to keep very few part of ram to keep free and available rest part is always kept full. Once you open any app, it will be kept on the RAM even after closing the app and so on. Once your ram is about to full and you want to start a new app, Android will automatically remove unused app data from ram. So how these help to improve performance? Obviously you'll be using some apps frequently, so loading this app again and again will create great impact on battery life and cpu performance. Thus by storing apps android makes your apps load faster.
Why you should not use any task killers?
What exactly your Task killers do?
Task killers are generally apps which force an app to quit or I say ERASE Cache from RAM which helps to make you phone faster as explain above, Task killers can be automated too.
Why you should avoid using Takes killers?
Sometimes you'll find BATTERY BOOSTING as a feature in description which is completely opposite to what it actually does. Once you run task killers its kills a lot of apps running in background, but some apps(IMs, Social apps) will automatically restart and consume more CPU cycles, leaving behind your phone laggy and draining battery way faster. So if you continue this many times you can expect a good enough DECREASE in battery life.
So what are better alternatives?
  • Don't install unnecessary apps.
  • If you've rooted your device, Use Greenify App and freeze apps you don’t want to use for some time.
  • DO kill web based app which are still running while Internet is not available, you can do this directly from setting-->apps->running-->find app-->Kill.

Go and make you phone more snappy by removing task killer ;)

Baca Selengkapnya ....

Enjoy our android *app* for Android bqbq

Posted by Unknown Selasa, 17 Desember 2013 0 komentar
Here it comes...android app for Android bqbq, because I feel my readers VIP and must be awarded with special treatment ;)
This app direcly download all articles on device and saves it for offline reading. App also help to share quickly.
Supported Android version :- 2.3+
Price:- Completely free
>>Download from Dropbox<<
>>mirror link<<
How to install...
1)Download from any link above
2)Send file to phone(if you've downloaded from PC)
3)Click on file --> Install --> Wait --> done! enjoy.
If yoy have any problem/bug/request then mail me ankushmenat(at)gmail.com or comment here, I'll try my best.

Baca Selengkapnya ....

Get free official access to Google, Gmail, G+ with airtel

Posted by Unknown 0 komentar
Airtel has partnered with Google to provide internet access to all via a International program known as "Freezone".
With freezone you can freely access Google, Google+ and Gmail free 1GB/month
>>Getting started with freezone<<
Use Opera mini or default browser I recommend Opera mini.
1GB of bandwidth is enough for anyone
fb is not working anymore. sorry!

Baca Selengkapnya ....

Want to buy a new phone within 15k? Wait, Why you should wait for Moto G!

Posted by Unknown 0 komentar
Motorola has announced it comeback to India after being owned by Internet giant Google. The phone with they are coming back to India is Moto G - The most value for money phone as of now.
The most awaited phone will lauch in January 2014 in India
Checkout few reasons why you should wait for Motorola Moto G
Extremely crisp sharp display...
Moto G has got one of the best display in budget phones. It features 4.5" 720p IPS LCD capacitive touchscreen with 326ppi pixel density. Gorilla Glass 3 provides very good protection from scratches and occational drops. Screen has very good color production and contrast ratio too.
Latest Vanilla Android OS : KitKat...
According to Motorola, Moto G in India will be shipped with Latest android version 4.4 aka KitKat and Motorola has kept it completely pure android(No useless UI toppings, no crap bloatwares). Don't worry about Updates, Being a Google phone Moto G will surely get quicker software updates and good developer support for Aftermarket modding/rooting/custom roms
Great internals...
Moto G under the hood is powered by Qualcomm Snapdragon 400 chipset with 1.2GHz Quad-core Cortex-A7 CPU accompanied by Adreno 305 GPU & 1GB of RAM. Moto G has scored more then 17k in AnTuTu benchmark(few points more then Nexus 4). The device is extremely fast(comparable to any sub-40k device) in day to day works. Most of the apps and games are supported.
USB HOST : OTG support...
Moto G supports USB On-The-Go, it means you can easily plug your Keyboard,Mouse, USB flash storage such as pendrives(Even externally powered hard disk) and mSD cards with tiny card readers such as Meenova. OTG supports makes it easier for users to share/Save lots of data.
Full day lasting battery...
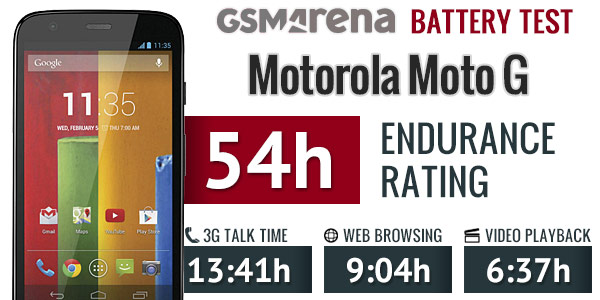
Moto G is powered by 2,070 mAh Non-removable battery With Moto G one can easily last for day of mix usage. GSMArena battery benchmark is about 54H enough for anyone in the age where most budget phones are suffering to last even a full day Moto G will be new era of android :P.
Shocking performence benchmarks...
Moto G beats Nexus 4 in AnTuTu very close to S3 and even faster then S3 in day to day tasks(opening browser, boot up, calling)
>>see all benchmarks on GSMArena<<
Only two drawbacks I found...
1)Limited storage(8GB or 16GB out of which 5.5GB and 13GB is user available respectively), no SD card slot though you can plug sd card reader with USB OTG. You will also get 50GB of google drive space to compensate this.
2)Non-removable battery(not a big deal) and not much awesome camera(it does the job but not meant for photographers)
Detailed list of specs...
quad-band Edge/UMTS/HSPA 3G support
4.5" 16M-color 720p IPS LCD capacitive touchscreen with 326ppi pixel density & Gorilla Glass 3
Android OS v4.4 KitKat
Qualcomm Snapdragon 400 chipset with quad-core 1.2GHz Cortex-A7 CPU with Adreno 305 GPU and 1GB ram
5 MP autofocus camera with LED flash capable of 720p video recording @ 30fps with HDR, continuous autofocus and stereo sound
1.3 MP front-facing camera
Wi-Fi b/g/n & Wi-Fi Hotspot
GPS with A-GPS; GLONASS
8/16GB of built-in storage
microUSB port with USB host OTG.
Bluetooth v4.0 LE
Standard 3.5 mm audio jack
Ambient light; accelerometer; proximity sensors
Active noise cancellation with dedicated mic
50GB of free Google Drive storage for two years
2,070 mAh non-removable battery.
Price ~13k for 8GB model ~15k for 16GB model... subjected to vary on single/dual sim versions.
Who should buy this phone...
Those who have limited budget and want a superfast phone with killer screen can buy this phone. Its best suited for day to day works such as browsing web, Social networks, IMs, Occasional gaming(that can be NFS:MW, Nova 3, Real racing 3 or any other highend game) and some selfies and occasional photography ;).

Get Moto G from flipkart


Baca Selengkapnya ....

How to save battery on your droid

Posted by Unknown Senin, 16 Desember 2013 0 komentar
In this post I'll give you tips to save your Android's battery and a How to get A
FULL DAY battery?
Common tips (anybody can do this with ease) :-
  1. Uncheck the Auto-Brightness and keep brightness to as low as 10%, also lower the screen timeout to 15 or 30 seconds. Add Power Control widget to your homescreen (comes preloaded with most phones). So you can increase brightness whenever necessary.
  2. Don’t use Live wallpapers, If possible keep your background completely black, Black color is battery-friendly as well as eyeball friendly.
  3. Don't keep Mobile data (2G/3G)/Wi-Fi/Bluetooth always on, simply turn off whenever not required.
  4. GPS is another biggest battery eater. Don't turn on GPS unless you need accurate data (for navigation).
  5. Turn off (or keep at least 1HR time between auto-refresh) BACKGROUND SYNC from social apps/web app, If you really don’t need them. e.g.
  6. Facebook, Twitter, TapaTalk, G+.
  7. Turn OFF vibrate/Haptic feedback feature as it consumes a lot of juice.
  8. Use WI-Fi whenever available (at home), it impacts less on battery comparing to mobile data connection.
  9. Disable bloatwares on your phone e.g. Samsung's S apps WARNING: Don't disable important system app.How to do this...Go to Settings->Apps->All apps->Select app(e.g. Samsung apps store)->disable.
  10. Weak cell signals may cause battery drain to increase dramatically, because radio will try a lot to establish connection. So if you know there is very few possibility of getting connection then better turn on the Flight mode temporarily.
  11. Don't use WEB based widgets unless you really need them. They increase load on CPU and indirectly on battery.
  12. Some apps wakes your device partially to collect data aka a "WAKE LOCK". This happens many times in day. Run the app Wake lock detector and find out which app is causing too much wake locks. Wake locks increase battery drain. IMs are generally biggest source of wakelocks, Google apps are second.
  13. Don’t use task killer/RAM Boosters.
  14. Reboot your phone at least once in week. (Press and hold power button —> select shutdown -> wait untill it shuts down -> to start again press and hold power button)
  15. Remove additional accounts (setting->accounts) from phone if you don’t use them.
  16. Don't let your phone getting too much hot. This improves battery lifespan.
  17. If you have 3G connection then Switch to GSM (2G) while browsing and switch to WCDMA (3G) when you want to download files or want to surf faster. 
  18. Use Opera mini browser for just browsing its way faster than others and light on resources (battery, CPU)
  19. Turn off Auto-Rotation when not required. Still you can’t get a day long battery then carry portable power banks

Advance tips:-
WARNING: I am not responsible for any thermonuclear wars, bricked phones. Rooting voids warranty, do it at your own risk. Do your own research before
doing anything.
  1. *ROOT* Use Greenify (or Titanium backup) app and freeze useless appse.g. Social apps. WARNING: If you freeze IM apps you won’t get any message until you de-freeze it again.
  2. Clear you cache at least once in month... Do this by Going to recovery —>Clear cache partition.
  3. *ROOT* Undervolt/Underclock your device by using SetCPU when you don’t need much processor power.
  4. *ROOT* Uninstall bloatwares which are useless in most cases. if you are not sure about certain app then better do a GOOGLE search about it.
  5. Use app Tasker it is multipurpose tool to automate android by creating different profiles (e.g. turn off connectivity when display is turned off for more than 5 minute and so on)
  6. *highlyAdvance* Install any battery friendly Kernel (such as Franco).
  7. *highlyAdvance* Set to powersaver Kernel governors when you don't need performence.

Baca Selengkapnya ....

5 Ways To Sell Your Phone For a New Latest Phone

Posted by Unknown Rabu, 11 September 2013 0 komentar
New phones and devices are constantly released to consumers in a fast way so much that its so difficult to keep up. How do one make sure that he  gets the latest device as its being released on hand?
well, there is a way to achieve that without hurting the pocket deeply, and that way is to constantly sell your device, add a few bucks and you are set to buy a new device. However, the problem is finding a buyer and this where this post becomes useful.

eBay is very popular for its auction prowess and everyone knows it. Here you can put up your phone for sale by registering with eBay and then get a good image of your phone and place the advert. Since eBay is seen by millions of people, you should get a quick offer and therefore sell your phone.


However, you have to be very careful of fake people that may want to scam you of your device so you are advised to only sell to people with good rating and have joined eBay long enough.

Well, this is even a better option for the Nigerian guys who want to sell their phones but can't go through eBay due to limitations.


DealDey is a perfect place to sell your phones. Like eBay, you need to signup and then place a good image of your marchandise on the DealDey webpage with the price and due date. Make sure your price is affordable so that you can quickly get a buyer. You may be surprised that in matters of days, your buyer would come and you will just add few bucks so that you can buy that dream phone.


As at this writing, Amazon is doing a trade - in program for those willing to sell their Phone for a fee.


Its a good way to get rid of that phone so that you can get yourself a new one that would increase your bragging right.
Check out the link provided and see how your wish could be a reality


Yes, nairaland is a good place to auction your phone. You would be surprised at the good deals you would get from selling your phone in Nairaland. This is especially useful to my Nigerian peeps that want to quickly sell their phone to get a new one. 


One great thing about selling through nairaland is that you are not paying anyone any commission. Its totally a direct marketing of your phone. All you need do is go to the appropriate forum and announce your intention to see your phone, put all the features and specs and you should get a buyer in no time.

5. Finally, Facebook is the place to get anyone's attention just buy displaying an image of your device. You can also sell anything here. 


You can either do a paid advertising or just upload your phone's image and put the details there. Of course people would see it and would attract buyers from every angle.


That is is folks, 5 ways to sell your phone for a new one buy adding small cash to it. Definitely, this would ease the pocket and everyone is happy.

Like our Facebook page and follow on Twitter for more tech news, guides and helps

Baca Selengkapnya ....

Parental Tools For Keeping Your Child Safe Online

Posted by Unknown Sabtu, 07 September 2013 0 komentar
Parental Control Software and Computer Monitoring Software
In such a short amount of time, the internet has become more common place in our lives than we could have ever imagined. Today, a world without the conveniences and the joys of the internet is unimaginable and we are learning of new ways to use and enjoy it all the time. It's practical uses are diverse: looking up directions, sending a gift, learning to play guitar, watching a film – all of these activities are things we can now do quickly and easily in the comfort of our own homes.

For our children, teaching them to use the internet effectively and safely is ever increasingly important to us as parents. The benefits of the thousands of educational resources available online massively outweighs the drawbacks of the dangers we also find on the world wide web, but those dangers do pose a problem – one that can worry parents when they're introducing there younger children to the online world. Thankfully, some savvy computer programmers have put together some brilliant tools to alleviate our concerns as parents.

Although there are a wide range of tools that can help, I'm going to concentrate on the two that I think are the most helpful. They are Parental Control Software and Computer Monitoring Software, and each of these tools can help parents in their own unique way. Let's take a look at each of these in turn.

Parental Control Software:

Parental Control Software can monitor, filter and block web pages depending on its content. If you have young children and you're worried they're going to be exposed to adult web pages of some kind (this could be gambling, alcohol, violence, pornography etc...) then this is for you. Parental Control Software will scan a web page before it is shown for a range of keywords and if it deems the page unsuitable, it will block it, if not it will show it.

Computer Monitoring Software:

Computer Monitoring Software works similarly, but slightly differently than Parental Control Software, and is great for parents of teenagers or older children who you want to give a bit more freedom online, but are still slightly worried. Computer Monitoring Software will monitor (secretly) every web page that is visited and any application used, so that you can look through reports and see what your children have been looking at at a later date. Computer Monitoring Software also monitors keystrokes and documents, and will take screen shots of visited websites.

You could even use parental control and computer monitoring software together, to create a powerful combination of tools that's sure to keep your child safe online. If you'd like to find out more about these parental tools, head over to the Gecko Parents website here.


Image Credit: Clare Bloomfield.

Baca Selengkapnya ....

Solution for Android ViewPager inside a ScrollView

Posted by Unknown Minggu, 02 Juni 2013 0 komentar
I really like Android ViewPager component. It can be used in so many ways: from app navigation to gallery like screens. 

ViewPager scrolling issue.
However, as I mentioned in my previous article ViewPager is not very usable if it's nested into a container with vertical scrolling. E.g. ViewPager inside ScrollView or ListView with ViewPager as a list item view. Imagine the case: you drag the ViewPager's page to view the next one, and booms! page horizontal scrolling is interrupted and parent vertical scrolling begins. 

Why? The issue is caused by intercepting of touch events from ViewPager by parent container. Parent scroll container listens for scroll touch events and if there vertical shift it steals the event from it's child views. It just thinks that user wants to scroll the parent container vertically.
So, let's help him with a more accurate decision!

Solution.
Full source code of my ViewPager subclass that resolves scrolling directions much much better is available here: SmartViewPager.java
It doesn't require any special configuration or actions from you. Just use it instead of the regular ViewPager and your users will be happy with a new smooth and expected scrolling behavior! ;-)
So, how it's done? There are two extras to help.
  1. custom SimpleOnGestureListener subclass helps us to detect the initial direction of scrolling. If the X-axis shift greater than the Y-axis shift, it will tell ViewPager to call requestDisallowInterceptTouchEvent at the parent.
  2. if the scroll gesture was initiated horizontally then ViewPager will be "locked" until gesture completion (finger up). So the parent scroll container will not be able to intercept ViewPager's events. It's somewhat similar to iOS scroll view behavior which locks the scrolling axis when the scrolling direction (horizontal or vertical) was resolved.
Will that extras break the original parent vertical scrolling? No, don't worry, all scroll directions are perfectly accessible. Here is the sample video from my Urban Curiosity application:


Check out that article to read more about the pitfalls you may encounter during 4-directions swipe navigation implementation:
http://vision-apps.blogspot.com/2013/05/4-directions-swipe-navigation.html

Sample project is available here:
https://bitbucket.org/NxAlex/swipes-navigation-demo 

Thanks for your attention! :-)

Baca Selengkapnya ....

4-directions swipe navigation

Posted by Unknown Senin, 27 Mei 2013 0 komentar
Gestures navigation.
I like fresh approach. And while I was developing my Urban Curiosity application I wanted to make it fresh by solving the common issue in a different manner . So I decided to make the application navigation based on swipe gestures and not on ActionBar, which is cool and handy navigation pattern that is used in near all modern applications.

Why gestures? Well, gestures can be performed on a larger screen area, so you can make a desired action faster and easier if to compare with a finger tap. Just swipe with your finger from any place to the desired direction! Also gestures are fun to use. :-)

In Urban Curiosity application you may navigate across all 4 main parts (Places, Profile, History and More) with a swipe gesture. Regular tap navigation is also available. I've prepared a short demo of the 4-directions (left, right, top, bottom) swipe navigation. The video itself is jaggy a little bit due to the video recording frame rate limitation. You may play with the real app to see how smooth it is. The demo video:


So in this article I want to share how to implement this in your projects.

Implementation.
Horizontal swipes are trivial - ViewPager class from the support library is perfect for this purpose. But what about vertical swipes and how to mix it with horizontal VerticalPager?

I've played with several open source implementations of vertical pagers for Android.
Not so buggy one as others is implementation by Grantland Chew: https://github.com/grantland/android-verticalpager 

So I have chosen it as a base for vertical paging. However, to reach my needs I needed to extend it a little bit:
  • remove the code that shrinks the first page a little bit to make the beginning of the next page visible
  • change onMeasure to a better mesuring pages height
  • add method to request page snap with a custom duration
  • add method to lock/unlock pages switching 
Now, we have the following choice: embed VerticalPager into ViewPager or vice versa. For the sake of simplicity and usage of nested fragments I decided to embed ViewPager into the VerticalPager. That way, our activity will have a VerticalPager with three fragments: top,  central and bottom. Central fragment is a composite fragment and has three nested fragments: left, central and right. Pretty simple. Why fragments? More than likely each page will be completely different from thee others and has a custom behavior logic. In order not to overburden Activity object with all that stuff - fragments will help you to separate your code into smart reusable modules.

Next, we need to notify somehow VerticalPager (it's part of the activity) from the ViewPager (it's part of the fragment) about pages swipes to allow/disallow vertical scrolling. E.g. for left and right pages there should be no (i.e. disabled) vertical scrolling, while for central page there should be one (swipe to the top or bottom pages). 

The common way for fragment-activity or fragment-fragment communication is to:

  1. declare an interface into a fragment
  2. implement it into an activity
  3. provide that implementation to the fragment
  4. finally, the fragment will trigger it when needed (e.g. page changed). 
I like that way in general, it allows to keep things loosely coupled. However, that approach is pretty verbose. So there is another way to establish a "blind" communication between application parts. It's an event bus.

There are several Android event bus implementations. I wish to highlight three of them here. They were created specifically for Android and I used each of them extensively in a lot of projects. So feel free to choose the one you like more.


For this sample project I chose Otto. It has proven history of usage (at least by me and my team and by Square guys in their apps :-) and pretty easy to integrate and use.

So all communications are pretty easy now: 

  1. fragment with a ViewPager will post an PageChangedEvent event
  2. activity with a VerticalPager will receive that event and decide whether there is any need to lock the vertical paging or not. 
Do you see the cool thing here? Activity knows nothing about the fragment internals, it just declares "hey, notify me about page changes. I don't care where they came from, just notify me - I will do the rest". However, I want to warn you to use event bus very carefully. With a bad project design and events usage it can be hard to understand what and why happens in the project. Yes, there is a plugin for Intellij IDEA to navigate between events posted by Otto. But, you know, tools are never smart enough to make all the things for you.
So, event bus is a powerful tool in your arsenal, but use it with caution. 

The last thing I want to mention is ViewPager scrolling behavior. The default ViewPager from support library is a good and mature component. However, when it's used in a scroll based container it becomes hardly usable due to the scroll container touch events interception. I will write a note about soon. Right now you can find here my ViewPager extension that is much much better at resolving scrolling directions.

Sources.
The full sample project with 4-directions swipe navigation is shared at my Bitbucket account:
https://bitbucket.org/NxAlex/swipes-navigation-demo

Let me to know if it helps you or you have some question related to the topic! :-)

Baca Selengkapnya ....

Android: crash reports libs and services

Posted by Unknown Rabu, 29 Agustus 2012 0 komentar

The world is not ideal. And even the best tested applications crashes sometimes.
That is why it's important to receive detailed crash reports to find the crash reason and fix it!
Leaving your users with crashes alone, while developers don't even know about crashes - is the worst case scenario! You should always be in touch with users to provide the best user experience.


So how we will make it?
Well, you may know that Android 2.2 Froyo introduced a bug report feature. Developers will receive freeze and crash reports from their apps. It looks something like this:


When app crashes Android run-time will pop-up dialog with option to send report about what happens.
Well, it's definitely not bad. But user may just skip it by pressing "Force close" button. And we also need to support our users with pre Android 2.2 devices.

So in this article I want to list several libs and services that may be useful for crash reports handling.


1) ACRA http://code.google.com/p/acra
I suppose it was one of the first solution for Android apps (SDK v1.5+ support) to handle crashes. It's free and open source! :) And now it's very mature and has a lot of great options:

  • configurable user interaction (silent reports, Toast notification, status bar notification + dialog)
  • detailed crash reports
  • ability to add your own variables content or debug traces
  • send error reports even if the application doesn't crash
  • and more!

All you need to do is to add small jar file to your project, configure it a little bit (usually which data to send and where to send) and that's it! Now next time app crashes, you will know about it and there will be details (such as phone vendor, model, stack-trace, etc.) about it.
Finally, I like ACRA a lot and it's my favorite tool for handling crash reports. ACRA is great, really!


Then, why do we need to talk about other tools if ACRA is so great?
First of all, variety is good. In the second place, you definitely will need some front-end to view and analyse all reports. But ACRA is just a library. Yes, ACRA can submit reports to Google Docs spreadsheets, but you may find it a little bit tedious to use.

So below there are tools and services that provide nice front-ends to visualize crash reports. Some of them has their own libraries (e.g. Crittercism), some of them can be integrated with ACRA (e.g. Bugsense or HockeyApp).
Most of them are paid (not all, e.g. Bugsnag actually is in free beta) but has free limited plans also.

2) Crittercism (crash reporting and customer support SDK for iOS and Android apps) 
http://www.crittercism.com 

3) BugSense (tool that collects and analyzes crash reports from mobile apps)
http://www.bugsense.com

4) Bugsnag (helps capture exceptions in real-time from web, mobile and desktop applications)
https://bugsnag.com

5) Logentries (log management and analysis service)
https://logentries.com/
Instructions how to collection data from ACRA:
http://www.vaudaux-ruth.com/android-log-collecting-with-acra-and-logentries

6) HockeyApp (provides the way to distribute app betas and collect live crash reports for beta and release apps on Mac OS X, iOS and Android)
http://www.hockeyapp.net
Instructions how to wire up HockeyApp with ACRA:
http://support.hockeyapp.net/kb/client-integration-android/how-to-use-acra-with-hockeyapp

7) Zibhium (a platform for Android beta distribution, real time crash analytics, with a built in support desk)
https://www.zubhium.com

If you know some other tools or services that can be helpful with app crash reports handling, then give me to know. I will add them to the list! ;-)


Baca Selengkapnya ....
Trik SEO Terbaru support Online Shop Baju Wanita - Original design by Bamz | Copyright of android illegal.