Tampilkan postingan dengan label galaxy note tutorial. Tampilkan semua postingan

Tutorial Install New TouchWiz Interface On Galaxy Note

Posted by Unknown Minggu, 04 Agustus 2013 0 komentar
Here you will find the step to install new touchwiz on Samsung Galaxy Note. A few hours is available a new firmware update for the Samsung Galaxy Note, which brings with it some very important changes. The firmware we're talking about is called N7000XXLRQ, this rom is based with android 4.0.4 jelly bean and was released for the moment only in Germany. this perfect and more userfriendly
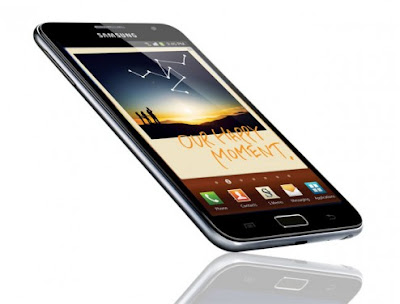
install touchwiz in galaxy note

The update is available via OTA, but if you follow these instructions you can also update manually by Flash Galaxy Note. Thanks to this firmware users can take advantage of the new TouchWiz interface of Galaxy S3, indeed, remember that many of the features in this update come precisely from the Galaxy s3 and Galaxy Note 2.For example the image gallery has been improved.

Here are other improvements
  • Backup and Restore of mms, sms and also via account settings Samsung
  • Popup Video with possibility of pinch to zoom, just like the leaked update of Jelly Bean for Galaxy S3.
  • Some features details of Galaxy S3 as Direct Call, launch camera gesture directly from unlock screen, etc.

In the video below you can see some of these new features:


How to install touchwiz for Galaxy note

Follow the step below to flash android 4.0.4 on galaxy note with android
  1. Download Odin 1.85
  2. Download the firmware for Samsung Galaxy Notes and unpack it.
  3. Turn off your Galaxy notes and restart it in download mode
  4. Connect the device via USB to your computer.
  5. Open Odin and click on PDA and afterwards select the file containing the firmware you downloaded earlier.
  6. DO NOT put the checkmark under re-partition;
  7. At this point click on Start and wait until the installation is complete.
  8. If your mobile phone is rebooting continuously then remove the battery for a few seconds and put it back.
  9. Reboot and enjoy your Samsung Galaxy notes!
Finish. After flash this rom you will get the new Touchwiz interface installed on your galaxy note, Enjoy.

Baca Selengkapnya ....

How To Flash Official Jelly Bean 4.1 To Galaxy Note 10.1 N8000

Posted by Unknown Sabtu, 27 Juli 2013 0 komentar
Galaxy Note 10.1 N8000 have been officially received the android 4.1 firmware update. And if you want to flash it manually you will find the tutorial here. Because today we will share how to flash official Android 4.1.1 On Galaxy Note N8000 via Odin. Android is good
Starts from the release of this rom many people that use this phone very satisfied with this rom. Android Jelly Bean or usually called as android 4.1 is very popular from the official release until now. 

And now the Officiall update to Jelly Bean 4.1.1 for Galaxy Note N8000 is available to download. As promised by Samsung, the update has come to the end of November and although it is not yet available via OTA (it will be soon)

As usual SamFirmware has released the official firmware that is obviously flashed through ODIN and following i will describe the procedure below.

The update brings many new features including faster overall system, the new effect Butter and many other improvements such as the Premium Suite perfected for use with the built in Samsung Pen.

install android 411 on galaxy note n8000


Read First


  • This Tutorial Use Android 4.1.1 Rom with XXBLK2 firmware version
  • This is the firmware details
    galaxy note n8000 firmware details
  • Do with Your Own Risk


Requirements


Flash Jelly Bean To Galaxy Note N8000

Please Read carefullt the explanation, so that you will successfully manually flash android 4.1 on galaxy note n8000

Ok Now follow this following Guide:

  1. You will not lose your data but it is advisable to make a backup. Read how to make nandroid backup.
  2. Extract the two files that you have downloaded before : ODIN (. rar) and ROM (. zip)
  3. Install Kies to install the Driver to connect your phone,  so that your computer will correctly recognizes the Galaxy Note N8000  when connected to the USB
  4. Have at least 50% of our Galaxy Note Battery 10.1
  5. Turn off your device
  6. Turn on your device the go to Download Mode (Press Home key + Volume Down + Power)
  7. Press Volume Up to confirm
  8. Open ODIN
  9. Click on PDA and go to look for the files in the ROM. Tar.md5
  10. You do not have to change any settings
  11. Connect your galaxy note 10.1 to your computer
  12. ODIN should recognize it automatically. If have been fully connected odin will display the word ID: COM in Yellow
  13. Press Start and wait for the operation until finish (take about 4-5 minutes so don't worry)
  14. Wait then your Galaxy Note 10.1 will automatically restart, yhen you can enjoy Jelly Bean 4.1.1

If you have any problems or concerns as well write it in the comments and we will help you as soon as possible. Ok i hope you can do this tutorial and successfully flash jelly bean rom to your galaxy note 10.1 n8000.

Baca Selengkapnya ....

How To Update Galaxy Note To Official Android 4.0.4 | Indonesia

Posted by Unknown Minggu, 14 April 2013 0 komentar
This is good news to all owners of Samsung Galaxy Note In Indonesia. Update Ice Cream Sandwich Android 4.0.4 for Samsung Galaxy Note official Indonesia (Indonesia Firmware - DXLR5) have been released. This update process include Android 4.0.4 ICS and Galaxy Note Premium Suite for the load version of Optimize for application S-Pen.Android is good


ICS 4.0 Notification Update
Samsung Galaxy Note Indonesia - ICS 4.0 Notification Update


Apart from Indonesia, neighboring countries like Thailand and Malaysia have also received the same update. Process of upgrading Samsung Galaxy Note to ICS 4.0 can be done either via OTA or Kies 2.0 .

For those who are familiar with ICS 4.0, there is no unusual thing except premium applications for S-Pen Suite.

Upgrade Using Kies

For safety, I advise you to do this process upgrade Galaxy Note using Kies. ( Link to download Kies 2.0 )

  1. Install Kies 2.0 to your PC,
  2. Connect Samsung Galaxy Note to the PC / laptop using the data cable that comes bundled with your phone,
  3. Kies will display the latest firmware,
  4. Perform data backup process - important data before proceeding with the upgrade process,
  5. Backup process is finished, continue the upgrade process (the time it takes depends on your internet connection).


Upgrade Using Odin

WARNING: Not recommended to those not confident.

Tools required;


Safety precautions before starting the flashing process;
  • This flashing process may cause your smartphone bricked (can not be used), so, .. any problems that arise are under your responsibility.
  • Perform backups. read how to create nandroid backup
  • Keep your smartphone battery in a level not less than 80% full.
  • Make sure you have installed Kies on the PC / laptop.

Step - Step upgrade Galaxy Note Via ODIN
  1. Set your smartphone to USB Debugging Mode (Settings -> Applications -> Development -> USB debugging)
  2. Set your smartphone to download mode by pressing Volume Down + Home + Power simultaneously for a period of 5 to 10 seconds.
  3. Start Odin on the PC / laptop.
  4. Connect the smartphone to a PC / laptop using USB cable.
  5. Wait for a few seconds until Odin recognize your smartphone.
    NOTE: Make sure you do not tick any other options on the Odin except Auto Reboot and F. Reset Time
  6. Click PDA button and select the firmware that you have downloaded previously. (Tar.md5 file)
  7. Click Start, and flashing process will be done. Smartphone at reboo t automatically after flashing process finished.

That's it. If all goes well, Your Samsung Galaxy Note has now been equipped with Android 4.0.4 ICS.

Baca Selengkapnya ....
Trik SEO Terbaru support Online Shop Baju Wanita - Original design by Bamz | Copyright of android illegal.