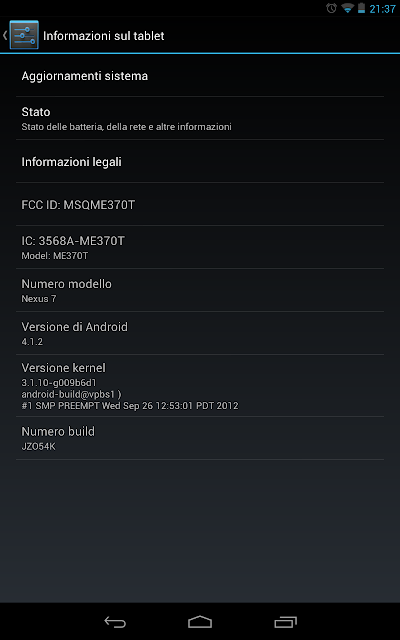
How To Flash Android 4.1.2 On Nexus 7 Manually
Sabtu, 06 Juli 2013
0
komentar
Nexus has been released the official android 4.1.2 update for nexus 7 Tablet. Actually you can update it via OTA but it may take more times because it depends on you internet connection. So to overcome this problem you can update nexus 7 to android 4.1.2 manually. But to do this you must know how to do the flash process because if you did something wrong you will brick you so be carefull. So at this time we propose a simple and straight forward guide to update your Nexus 7 to Android 4.1.2. The update is official and does not void the warranty, even though of course we do not assume any liability for any damages or otherwise to your Tablet. And this version is called JZ054K. Android is good

Flash Android 4.1.2 Via Custom Recovery
Requirements
- You must already run android JRO03D version
- Official update Google - Download
- Modified Recovery program installed from ROM Manager
Download from Play Store
- download the file
- renamed to update.zip (not necessary but still useful)
- copy in Tablet
- open rom manager, install the recovery for Nexus 7
- then reboot into recovery
- install the update zip package that just copied
- After finish restart
As you can see it all goes well and you have all the features in place without losing data or applications / settings. The method used involves Custom Recovery and Root acces to use ROM Manager when the Nexus 7 does not fit in the original recovery. So if you do not want to root your nexus 7 you can use the tutorial below
IMPORTANT
The original Recovery, has selected "Update from SD Card" and so it is not possible for anyone who has not at least unlocked bootloader.Here are the steps to upgrade to android 4.1.2 for those who have the tablet in stock with locked bootloader:
NB: I do not assume any liability for errors or problems with your tablet. If you have any questions just ask, but I do not take responsibility, of course. I have this procedure done by me and it works without problems.
How To Flash Android 4.1.2 On Nexus 7 Tablet
- Turn off your Tablet Nexus 7
- Press and hold the volume button + and - simultaneously and hold the volume button to start it in Fastboot / Bootloader.
- With the volume keys, select Recovery Mode
- Once in recovery select "Apply update from ADB"
- Place the file android 4.1.2 JZ054K firmware above in the folder where you have the files ADB.exe (if you have the Nexus 7 Toolkit is in its root directory).
- Do the same like if you flash with custom recovery: Rename the file to update.zip
- Use the following command: "adb.exe sideload update.zip".
- After that, give it 3-4 minutes and the terminal will be transferred to the update and upgraded (including bootloader).
- To clean, do a "Wipe cache partition".
- After reboot the Nexus 7, the first time you reboot after 1-2 seconds (normal, has completed the flash Bootloader).
Enjoy the 4.1.2 update on your nexus 7. I appreaciate your feedback and you can ask question on comment area below.
TERIMA KASIH ATAS KUNJUNGAN SAUDARA
Judul: How To Flash Android 4.1.2 On Nexus 7 Manually
Ditulis oleh Unknown
Rating Blog 5 dari 5
Semoga artikel ini bermanfaat bagi saudara. Jika ingin mengutip, baik itu sebagian atau keseluruhan dari isi artikel ini harap menyertakan link dofollow ke https://androidillegal.blogspot.com/2013/07/how-to-flash-android-412-on-nexus-7.html. Terima kasih sudah singgah membaca artikel ini.Ditulis oleh Unknown
Rating Blog 5 dari 5


0 komentar:
Posting Komentar